

Tired of wobbly, uneven cuts with your circular saw? A DIY circular saw guide is the ultimate workshop hack for perfectly straight, professional-quality cuts every time—without spending a fortune on a track saw!
In this step-by-step guide, you’ll learn how to build your own DIY circular saw guide using simple materials like plywood, MDF, or even an aluminum track. Whether you’re ripping plywood, crosscutting lumber, or tackling precision woodworking projects, this homemade saw guide ensures clean, accurate cuts with minimal effort.
Why Build a DIY Circular Saw Guide?

“If you’ve ever struggled with crooked cuts, splintered edges, or inconsistent widths while using a circular saw, you know how frustrating freehand cutting can be. Even a slight wobble risks ruining your workpiece—which is exactly why a DIY circular saw guide is a game-changer. This simple yet powerful circular saw guide transforms your ordinary saw into a precision cutting tool, delivering straighter, cleaner, and safer cuts every time. Whether you’re ripping plywood or crosscutting lumber, a homemade circular saw guide eliminates guesswork and upgrades your results instantly.”
The Problem: Why Freehand Cuts Fail
Cutting wood with a circular saw without a guide is like drawing a straight line without a ruler—possible, but rarely perfect. Here’s what can go wrong:
- Uneven edges: Blade drift leads to wavy cuts.
- Tear-out: Splintering ruins the finish on plywood.
- Inaccurate measurements: Even a small angle error compounds over long cuts.
- Safety risks: Uncontrolled saw movement increases kickback danger.
A DIY circular saw guide eliminates these issues by locking your saw onto a perfectly straight path, ensuring repeatable, professional results.
Benefits of a Homemade Circular Saw Guide
Why spend hours (and money) on expensive track saws when you can build your own guide for a fraction of the cost? Here’s why this DIY solution is a game-changer:
✅ Precision Every Time – Glide your saw along a fixed edge for dead-straight cuts with zero deviation.
✅ Cost-Effective Alternative – Commercial track saws cost hundreds—yours can be made for under $20 with plywood or MDF.
✅ Customizable Length – Need an 8-foot guide for plywood? No problem. Build it to fit any project size.
✅ Works with Any Saw – Whether you use DeWalt, Makita, or an old hand-me-down, this guide adapts to your tool.
✅ Better Tear-Out Control – A well-built guide reduces splintering for cleaner cuts on veneers and melamine.
DIY Guide vs. Track Saw: Which Should You Use?
Track saws are great, but they’re expensive and limited to their proprietary rails. A DIY circular saw guide gives you similar accuracy without the high cost.
- ✔ Best for Track Saw Users: If you already own one, stick with it for portability.
- ✔ Best for DIYers & Budget Woodworkers: Build a custom guide that’s just as accurate but way cheaper.
Real-World Uses for Your DIY Saw Guide
- Ripping plywood for cabinets or shelves.
- Crosscutting long boards without a miter saw.
- Breaking down sheet goods with factory-edge precision.
- Making repeatable cuts for furniture builds.
Bottom Line
If you want straighter cuts, less waste, and more control, a DIY circular saw guide is a must-have. It’s simple to build, affordable, and outperforms freehand cutting every time. Ready to make your own? Let’s get started!
Tools & Materials You’ll Need
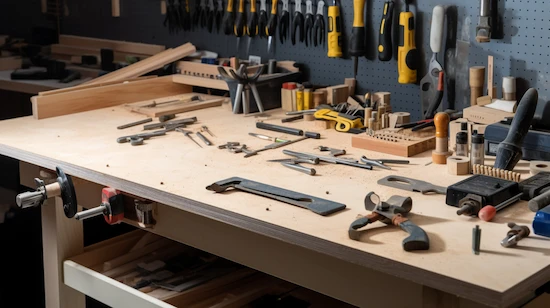
Building a high-quality DIY circular saw guide requires just a few basic tools and materials – many of which you probably already have in your workshop. Here’s your complete checklist to ensure you have everything ready before starting this simple project.
Essential Tools for Building Your Guide
Every woodworker needs these fundamental tools to construct their DIY circular saw guide:
✔ Circular Saw – The whole reason we’re building this guide! Any brand (DeWalt, Makita, Ryobi, etc.) will work.
✔ Clamps – At least two sturdy clamps (like Irwin Quick-Grips) to secure your guide during use.
✔ Measuring Tape – For precise measurements (a 25-footer works best for long guides).
✔ Speed Square or Framing Square – Crucial for ensuring perfect 90° angles.
✔ Pencil & Marker – For clear layout lines (a Sharpie works great for visibility).
✔ Drill/Driver – For assembling the guide (a basic cordless drill is perfect).
Best Materials for Your DIY Guide
You’ve got several great options for constructing your DIY circular saw guide:
1. Base Material (Choose One):
- ½” Plywood – Affordable and stable (birch ply works exceptionally well)
- MDF – Ultra-flat surface, but heavier than plywood
- Melamine – Super smooth surface helps the saw glide easily
2. Straight Edge Material:
- Hardwood (1×2 or 1×3) – Maple or oak provide excellent durability
- Aluminum Extrusion – For a professional-grade guide (more expensive)
- Precision-ground Steel – The ultimate in straightness (for serious woodworkers)
Optional Upgrades for Enhanced Performance
Take your DIY circular saw guide to the next level with these add-ons:
🔧 Non-Slip Grip Pads – Prevent the guide from sliding during cuts
🔧 T-Track System – Allows for adjustable width cuts (great for repeat rips)
🔧 Measuring Scale – Add a ruler for quick measurements
🔧 Zero-Clearance Strip – Reduces tear-out on delicate materials
🔧 Carrying Handle – For easier transport of long guides
Budget vs. Premium Build Options
| Component | Budget Option | Premium Option |
|---|---|---|
| Base | ½” Plywood ($15) | Baltic Birch Plywood ($30) |
| Straight Edge | Pine 1×3 ($5) | Aluminum Extrusion ($40) |
| Fasteners | Wood Screws ($2) | T-Track System ($25) |
| Non-Slip | Rubber Bands (Free) | Neoprene Pads ($10) |
Pro Tip: If you’re just starting out, the budget version works perfectly fine. You can always upgrade components later as needed.
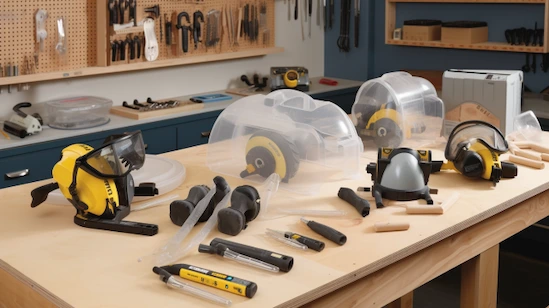
Safety Gear You Shouldn’t Skip
While building and using your DIY circular saw guide, always wear:
- Safety glasses
- Hearing protection
- Dust mask (especially when cutting MDF)
- Close-toed shoes
With these tools and materials gathered, you’re ready to start building your DIY circular saw guide! The entire project should take less than an hour for a basic version, and you’ll wonder how you ever worked without it.
Coming Up Next: We’ll walk through each step of constructing your guide with clear, detailed instructions and helpful photos to guarantee your success!
Step-by-Step Guide to Building Your DIY Circular Saw Guide
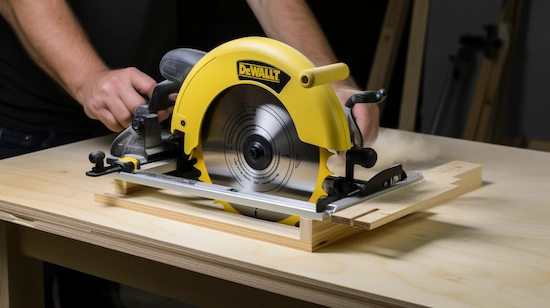
Follow these detailed instructions to create a professional-quality DIY circular saw guide that will transform your woodworking projects. We’ve included pro tips at each step to help you achieve perfect results.
Step 1: Prepare Your Work Area & Materials
- Clear a flat, stable work surface (like your workbench or saw horses)
- Gather all tools and materials from our checklist
- Measure your circular saw’s base plate from blade to edge (this determines your guide’s offset)
- Pro Tip: Use painter’s tape on your measuring points for better visibility
Step 2: Cut the Base to Size
- Decide on your guide length (4′ is versatile for most projects)
- Using your square, mark a perfectly straight line on your base material
- Cut the base to width (8-10″ works well for stability)
- Pro Tip: Cut slightly oversize, then trim to final dimension for cleaner edges
Step 3: Create the Precision Straight Edge
- Select the straightest piece of hardwood or aluminum for your guide edge
- Joint one edge if possible (or use the factory edge of plywood)
- Verify straightness with a known-straight reference
- Pro Tip: Shine a bright light behind the straight edge to check for gaps
Step 4: Assemble the Guide Components
- Position the straight edge parallel to your base’s long edge
- Account for your saw’s offset (typically 1.5-2″ from edge)
- Secure with clamps and check alignment along entire length
- Pro Tip: Use a sacrificial strip underneath when drilling to prevent tear-out
Step 5: Finalize the Guide Assembly
- Pre-drill holes to prevent splitting (especially in hardwood)
- Attach with countersunk screws every 8-12 inches
- Check for flatness across the entire assembly
- Pro Tip: Apply wood glue before screwing for extra rigidity
Step 6: Test and Calibrate Your Guide
- Make a test cut on scrap material
- Measure cut edge for straightness
- Adjust if needed by shimming or repositioning
- Pro Tip: Mark the “good” side of your guide for consistent results
Step 7: Add Safety and Convenience Features
- Apply non-slip tape to the bottom
- Mark measurement scales if desired
- Add handles for long guides
- Pro Tip: Color-code the ends for quick orientation
Troubleshooting Common Issues
🔧 Problem: Saw binds during cuts
✅ Solution: Check for baseplate interference and wax the guide edge
🔧 Problem: Cuts aren’t perfectly straight
✅ Solution: Verify straight edge hasn’t warped and screws are tight
🔧 Problem: Guide slides during use
✅ Solution: Add more non-slip material or use stronger clamps
Maintenance Tips for Longevity
- Store flat to prevent warping
- Keep the guide edge clean of sawdust buildup
- Periodically check and tighten all fasteners
- Apply paste wax to the guide edge for smoother operation
Your DIY circular saw guide is now ready for action! With this simple yet effective tool, you’ll achieve professional-quality straight cuts on every project. The total build time is about 45-60 minutes, but the time and frustration it will save you makes it one of the most valuable jigs in your workshop.
Coming Next: Learn expert techniques for using your new guide to make perfect rip cuts, crosscuts, and angled cuts with complete confidence!
Pro Tips for Using Your DIY Circular Saw Guide
Now that you’ve built your DIY circular saw guide, let’s unlock its full potential with these professional techniques and insider secrets. These tips will elevate your cutting precision from “good enough” to workshop-perfect every time.
1. Mastering the Perfect Cut: Technique Matters
The 3-Point Contact Method:
- Maintain firm pressure: 1) Against the guide, 2) On the workpiece, 3) Forward motion
- Start cuts with the blade guard retracted slightly before engaging
- Pro Tip: Let the saw reach full speed before beginning your cut
Controlling Tear-Out:
- Place the good side of material face down when possible
- Apply masking tape along cut lines for cleaner edges
- Use a zero-clearance insert (attach thin hardboard to your guide’s edge)
2. Advanced Cutting Techniques
Breaking Down Sheet Goods:
- Use 1-2-3 blocks as spacers when cutting full sheets
- Work from the factory edge whenever possible
- Pro Tip: Make initial rough cuts 1/4″ oversize, then final trim passes
Repeatable Rip Cuts:
- Mark measurements directly on your guide with permanent marker
- Create a story stick for common widths
- Use spacer blocks clamped to your guide for identical multiple cuts
Angled Cuts Made Easy:
- Build a simple angle jig that attaches to your guide
- Use a digital angle finder to set precise bevels
- Pro Tip: Mark common angles (45°, 22.5°) on your guide with colored tape
3. Workshop-Proven Setup Tricks
Guaranteed Straight Every Time:
- Check your guide’s straightness monthly with a known-straight reference
- Store hanging vertically or flat – never leaning
- Pro Tip: Apply furniture wax to the guide edge for smoother operation
Dust Control Solutions:
- Attach a vacuum hose mount to your guide
- Use compressed air to clear the track between cuts
- Position a shop vac nozzle at the cut point
Safety Enhancements:
- Always clamp both the workpiece AND guide when possible
- Use push sticks for narrow cuts
- Pro Tip: Mark a “danger zone” on your guide where the blade exits
4. Maintaining Peak Performance
Monthly Maintenance Routine:
- Inspect for warping or damage
- Tighten all fasteners
- Clean sawdust buildup from edges
- Reapply non-slip material as needed
- Pro Tip: Keep a maintenance log with dates
When to Retire Your Guide:
- Visible wear along the guide edge exceeding 1/16″
- Warping that can’t be corrected with clamping
- Screw holes that have become enlarged
- Pro Tip: Recycle old guides into shorter specialty jigs
5. Real-World Applications
Cabinet Making:
- Perfectly straight cabinet side panels
- Identical shelf widths every time
- Flawless dados and rabbets
Deck Building:
- Uniform deck board overhangs
- Precise notching around posts
- Clean fascia board cuts
Finish Carpentry:
- Accurate trim molding miters
- Flawless door/window casings
- Perfect baseboard joints
Pro Tip: Keep a dedicated “finish quality” guide with extra-fine edges for visible cuts
Troubleshooting Common Issues
| Problem | Solution | Prevention |
|---|---|---|
| Burning marks | Check blade sharpness, reduce feed rate | Use lubricant (paste wax) on guide |
| Rough cuts | Replace blade, check guide alignment | Clean guide edge before each use |
| Inconsistent width | Verify guide parallelism | Measure at both ends before cutting |
| Slipping during cuts | Add fresh non-slip material | Ensure clamps are properly tensioned |
Remember: Your DIY circular saw guide is only as accurate as your setup. Take those extra few seconds to verify measurements and alignment – it pays off in perfect results every time. Now go make some museum-quality cuts!
Alternative DIY Saw Guide Ideas & Upgrades
Your basic DIY circular saw guide is just the beginning! These innovative upgrades and alternative designs will transform your humble jig into a versatile workshop powerhouse capable of handling specialized cuts with professional accuracy.
1. Advanced Guide Systems for Specialized Cuts
T-Track Adjustable Guide System
- Install aluminum T-track along your guide’s length
- Add a movable fence with locking knobs for variable widths
- Pro Tip: Embed measuring tape in the track for instant measurements
- Best for: Repeatable rip cuts at multiple widths without recalibration
Zero-Clearance Hybrid Guide
- Attach replaceable MDF or hardboard facing strips
- Cut into the strip with your saw to create a perfect blade channel
- Pro Tip: Make several strips for different blade thicknesses
- Best for: Ultra-clean cuts in veneered plywood and melamine
Angled Cutting Guide Attachment
- Build a pivoting base that locks at common angles
- Incorporate a protractor scale for precision angle setting
- Pro Tip: Add detents at 15°, 22.5°, 30°, and 45° positions
- Best for: Perfect bevel cuts without complicated measurements
2. Material-Specific Guide Upgrades
Non-Marring Guide for Finished Surfaces
- Line contact edges with self-adhesive felt
- Use clear acrylic as a base material
- Pro Tip: Apply urethane bumper strips to the underside
- Best for: Cutting pre-finished materials without surface damage
Metal-Cutting Guide Conversion
- Replace wooden straight edge with aluminum extrusion
- Add cutting fluid channels for metalwork
- Pro Tip: Use carbide-tipped blades when converting for metal
- Best for: Aluminum trim and thin sheet metal cutting
Concrete & Masonry Guide
- Construct with waterproof HDPE plastic base
- Incorporate diamond blade clearance
- Pro Tip: Add weight pockets for stability on rough surfaces
- Best for: Cutting cement board and masonry products
3. Smart Upgrades for Enhanced Functionality
Integrated Measurement System
- Embed a digital readout with magnetic scale
- Add flip-down measuring stops
- Pro Tip: Use a laser-etched stainless steel ruler
- Best for: Production work requiring exact repeatability
Dust Collection Integration
- Route vacuum hose channels into the guide
- Add brush seals along the edges
- Pro Tip: Position collection at both entry and exit points
- Best for: Clean workshop environments
Lighted Cutting Guide
- Install LED strip lighting along the cut line
- Power with tool-mounted battery pack
- Pro Tip: Use directional lighting to highlight the kerf
- Best for: Low-light job site conditions
4. Space-Saving & Portable Variations
Foldable Jobsite Guide
- Create a hinged design that folds in half
- Use aircraft aluminum for lightweight strength
- Pro Tip: Add carrying handles and shoulder strap mounts
- Best for: Contractors and mobile work
Modular Sectional Guide System
- Build interlocking 2-foot sections
- Incorporate alignment pins for perfect connections
- Pro Tip: Color-code sections for quick length identification
- Best for: Variable length cuts in confined spaces
Wall-Mounted Storage Solution
- Design with French cleat hanging system
- Include integrated tool holders
- Pro Tip: Outline the guide shape on the wall for quick visual inventory
- Best for: Small shop organization
5. Specialty Cutting Jigs That Work With Your Guide
Dado & Rabbet Cutting System
- Add adjustable width spacers
- Incorporate depth stop blocks
- Pro Tip: Use micro-adjustment knobs for precision
- Best for: Joinery and groove cutting
Circle Cutting Attachment
- Build a pivot arm that mounts to your guide
- Include adjustable radius settings
- Pro Tip: Add a bearing for smooth rotation
- Best for: Cutting perfect circles up to 24″ diameter
Taper Jig Conversion
- Develop an adjustable angle sled
- Incorporate a cam-lock tightening system
- Pro Tip: Pre-mark common taper angles
- Best for: Furniture legs and decorative elements
Upgrade Comparison Chart
| Upgrade | Cost | Difficulty | Best Application |
|---|---|---|---|
| T-Track System | $$ | Intermediate | Frequent width changes |
| Zero-Clearance | $ | Beginner | Veneered materials |
| Angled Base | $$ | Intermediate | Trim work |
| Digital Readout | $$$ | Advanced | Production shops |
| Foldable Design | $$ | Intermediate | Mobile contractors |
Pro Tip: Start with one or two upgrades that match your most common cutting needs, then expand your system over time. Even basic upgrades can yield professional results when properly implemented.
These innovative DIY circular saw guide variations prove that with some creativity, your homemade guide can outperform expensive commercial systems. The key is identifying which features will most benefit your specific projects and workflow. Remember – the best jig is the one you’ll actually use regularly!
Conclusion
Creating a DIY circular saw guide is a simple yet essential project for anyone looking to achieve precise and straight cuts in their woodworking projects. By following these 10 easy steps, you can build a reliable DIY circular saw guide using basic materials and tools. A well-made DIY circular saw guide ensures accuracy, enhances safety, and improves the quality of your work. Whether you’re a beginner or an experienced woodworker, having a DIY circular saw guide in your workshop will make cutting tasks much easier and more efficient. Start your project today and enjoy smoother, more professional cuts with your DIY circular saw guide!
")