
Upgrading your space doesn’t have to mean a major renovation. With diy door trim molding, you can add instant style and character to any room in just a couple of hours. Whether you want to refresh tired doorways or create a custom look that rivals the pros, this project is surprisingly simple and budget-friendly. In this guide, you’ll find clear steps, expert tips, and creative ideas to help you get perfect results, even if you’re new to home improvement. Let’s dive into everything you need to know to master diy door trim molding and transform your entryways with confidence.
Why DIY Door Trim Molding? Fast Home Upgrades for Modern Style

Upgrading the look of your home doesn’t always require a costly renovation. Sometimes, the smallest details can make the biggest impact—especially when you focus on the features you see every day. Doorways are often overlooked, but updating them with new trim molding is a quick, affordable way to create a modern and cohesive look throughout your space. This approach not only boosts your home’s style, but also adds value and appeal in a matter of hours.
Choosing diy door trim molding is also a smart choice for the environment and your budget. By taking a do-it-yourself approach, you can source sustainable materials, reduce waste, and cut down on unnecessary packaging and transportation. Plus, learning to complete simple projects at home encourages responsible consumption and supports climate action by extending the life of your home’s existing materials.
Practical examples and case studies:
- Swapping outdated trim for a simple craftsman-style design instantly makes any entryway feel more modern and welcoming.
- Painting door trim with low-VOC, eco-friendly paints creates a fresh look while improving indoor air quality.
- Replacing builder-grade molding with reclaimed wood or FSC-certified options gives your doors unique character and supports sustainable forestry.
- Homeowners on Pinterest and Instagram share before-and-after photos of how a weekend diy project transformed the feel of their hallway or bedroom.
- One DIYer reported spending under $100 for materials and finishing three doors in just one afternoon, all while using eco-conscious products.
A fast home upgrade doesn’t have to be complicated. With a little creativity and the right materials, you can use diy door trim molding to bring modern style, climate responsibility, and personal satisfaction to your next home improvement project.
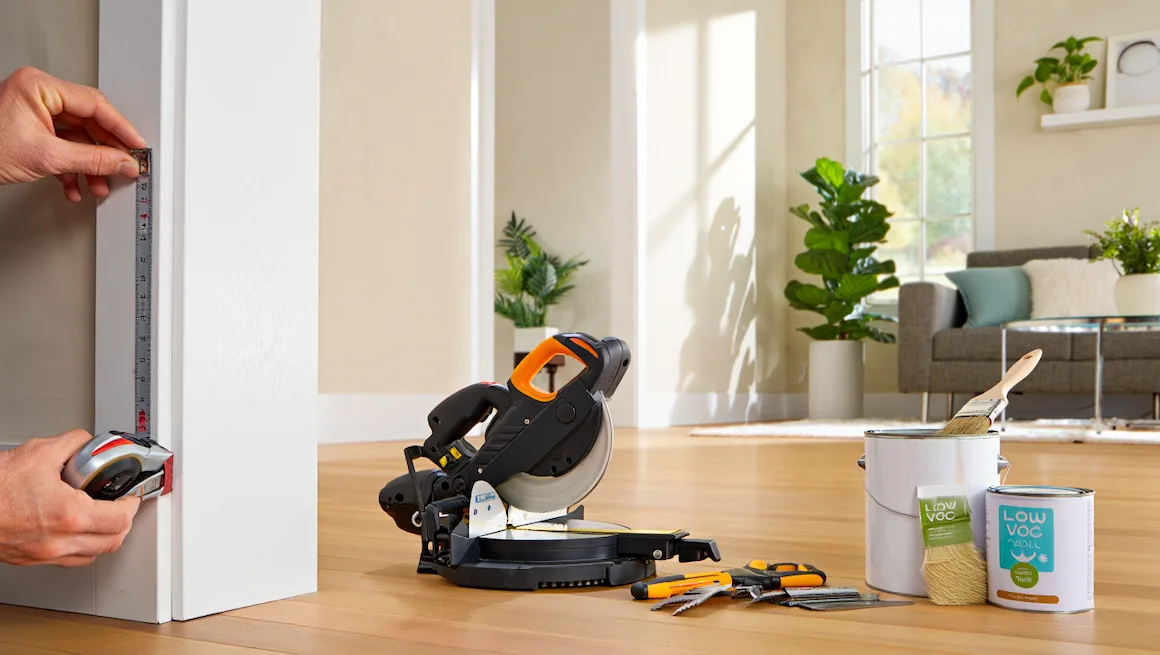
Tools & Materials Checklist for Quick Door Trim Molding Project
Before you start your project, having the right tools and materials ready is essential for a smooth, stress-free experience. With a simple checklist and a few smart choices, you’ll save time, reduce waste, and set yourself up for impressive, professional-looking results—even on your very first try. By making responsible material decisions, you’ll not only improve your home but also support climate-friendly practices and sustainable renovation.
Using the right supplies for diy door trim molding means you can work efficiently while also prioritizing eco-friendly options and trusted brands. Choosing quality tools and sustainable materials helps reduce your project’s environmental footprint and contributes to a healthier home for your family.
Checklist, examples, and practical ideas:
- Measuring Tools: A quality tape measure and a carpenter’s square help ensure your cuts and alignments are accurate, minimizing waste.
- Cutting Tools: A miter saw or handsaw (manual or powered) makes precise angle cuts simple; consider renting tools instead of buying if you want to reduce consumption.
- Fastening Supplies: Use a finish nailer or hammer with finishing nails—brands like DeWalt and Ryobi offer durable, long-lasting tools. Adhesives such as Liquid Nails or Gorilla Glue are ideal for extra hold.
- Trim Materials: Opt for MDF, pine, or reclaimed wood for your molding. FSC-certified trim and low-VOC paints from brands like Behr or Benjamin Moore are great for both the environment and your indoor air quality.
- Finishing Tools: Sandpaper, caulking gun (for filling gaps), and quality brushes or rollers for a smooth paint finish. Consider eco-friendly caulks and recycled-content brushes to further support sustainable choices.
- Where to Buy: Home Depot, Lowe’s, IKEA, or Etsy are reputable sources for tools and materials—many now offer “green” product lines or locally sourced options.
With this checklist in hand, you can confidently start your diy door trim molding project, knowing you’re making choices that are good for your home, your wallet, and the environment.\
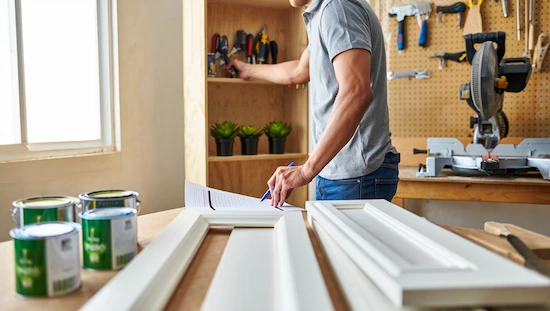
Step-by-Step DIY Door Trim Molding Installation (Under 2 Hours)

Tackling a home upgrade project doesn’t have to take up your whole weekend. With the right plan and preparation, you can complete a stylish door trim transformation in less than two hours. This step-by-step approach will help you achieve a professional finish with minimal stress, whether you’re a first-time DIYer or looking for a fast refresh. By reusing materials where possible and choosing responsible products, your installation can also support sustainability and smart resource use.
Completing a diy door trim molding project quickly means you’re saving energy, reducing the need for costly contractors, and keeping your home’s footprint small. Let’s walk through each phase so you can get beautiful results and feel good about your choices.
Step-by-step guide, practical tips, and real-life examples:
- Prep and Remove Old Trim: Carefully pry off existing trim with a putty knife or trim puller. Save reusable pieces for other projects or donate them to reduce waste.
- Measure and Mark: Use a tape measure and pencil to mark the precise lengths needed for each side of your door. Double-check measurements to avoid unnecessary scrap.
- Cut the Molding: Set your miter saw to 45 degrees for corners and cut your new trim to size. If you’re new to power tools, a simple miter box and handsaw will also do the trick.
- Install the Trim: Attach each piece with a finish nailer or hammer and finishing nails, making sure edges are flush. Use strong adhesives like Liquid Nails if you want extra hold—perfect for rental spaces where you want minimal wall damage.
- Fill, Caulk, and Paint: Fill nail holes with putty, run a bead of eco-friendly caulk along the edges, and finish with low-VOC paint. This step not only ensures a flawless look but also improves air quality in your home.
- Quick Tip: Work one side at a time and keep your workspace organized for maximum efficiency. One family shared their experience finishing three doors in a morning, all using reclaimed wood and leftover paint for a sustainable touch.
By following these steps, you’ll see just how easy it is to transform your space with diy door trim molding—no professional crew or expensive materials required.
Inspiring DIY Door Trim Molding Ideas for Every Room
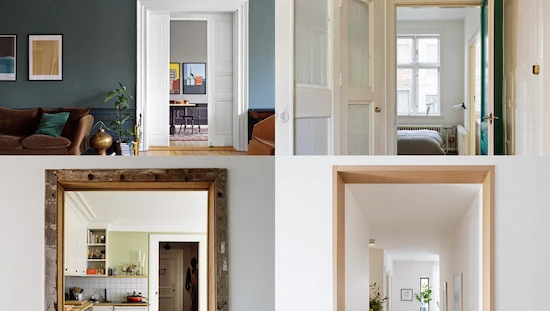
Transforming your home with creative trim details is easier than you might think. Whether you want a subtle update or a bold statement, there’s a style to fit every space and personality. Modern homeowners are embracing eco-friendly design choices and personalized touches that elevate each room—without breaking the bank. Choosing sustainable materials and innovative techniques for your diy door trim molding ensures your project is not only stylish but also environmentally responsible.
From minimal and sleek to ornate and classic, these ideas will help you find the perfect approach for your home’s unique needs. Here are some standout concepts and practical examples to inspire your next diy door trim molding project:
Creative ideas and real-world examples:
- Modern Craftsman Entryway: Install clean, straight-edged molding with a wide profile for a dramatic and contemporary look. Use reclaimed wood or FSC-certified trim to keep your upgrade sustainable and budget-friendly.
- Classic Colonial Living Room: Frame your living or dining room doors with layered, decorative molding. Painting your trim in a contrasting shade (like charcoal or navy) makes the details pop while using low-VOC paint to improve indoor air quality.
- Minimalist Bedroom: Choose slim, squared-off trim for a barely-there, modern aesthetic. Homeowners often share their minimalist door transformations on Pinterest and Instagram for fresh inspiration.
- Farmhouse Kitchen: Add rustic charm with shiplap or beadboard-style trim. Many DIYers source eco-friendly materials from Etsy or local lumber yards to give their kitchen doors unique character and support small businesses.
- Budget-Friendly Kids’ Room: Use MDF or pre-primed molding to create fun, geometric shapes or picture frame outlines. Reuse leftover paint and materials from other projects to keep costs—and environmental impact—low.
No matter your design preference or skill level, there’s a diy door trim molding solution that fits your vision and values. Embrace creative materials, sustainable practices, and personal touches to create a look that truly transforms every room.
Pro Tips for Lasting Results & Minimal Hassle
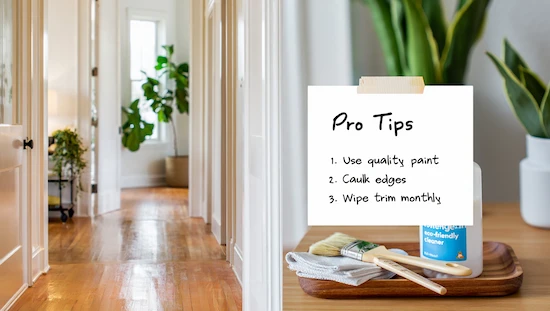
Once you’ve completed your upgrade, a few professional strategies will ensure your hard work stands the test of time. Proper care and smart decisions can keep your trim looking fresh, reduce the need for frequent touch-ups, and even help the environment. By taking small, responsible steps, your diy door trim molding project can deliver lasting beauty while supporting sustainability in your home.
For anyone seeking hassle-free results, these proven tips and real-life examples make it easy to protect your investment and avoid common pitfalls. Here’s how to maintain your diy door trim molding for years to come:
Smart maintenance and practical case studies:
- Choose Durable, Eco-Friendly Materials: Select trim made from FSC-certified wood or recycled MDF, and finish with low-VOC or natural paints to safeguard both your home’s air quality and the planet.
- Seal and Protect: Use caulk around the edges to block drafts and moisture. One homeowner shared how using silicone-based caulk cut down on seasonal repairs and made cleaning easier.
- Regular Cleaning: Wipe down trim with a damp cloth to prevent dust buildup. Avoid harsh chemicals—natural cleaners are both effective and gentle on painted surfaces.
- Easy Touch-Ups: Save leftover paint for future repairs. A quick coat can make scratches and scuffs disappear, keeping your diy door trim molding looking brand new.
- Know When to DIY or Hire a Pro: If you encounter water damage or tricky angles, consulting experts from trusted resources like This Old House or DIY Network can help you avoid costly mistakes and keep your project on track.
By combining these pro tips with mindful product choices, you’ll ensure your diy door trim molding stands out for its durability, beauty, and responsible craftsmanship.
Conclusion
Upgrading your space with diy door trim molding is a smart, satisfying project that offers immediate results and lasting benefits. Not only does it boost your home’s style and value, but it also gives you the freedom to customize each room in a way that reflects your personal taste and priorities. By following modern installation techniques, choosing sustainable materials, and caring for your work with simple maintenance, you’ll enjoy the rewards of your efforts for years to come. Whether you’re a first-time DIYer or an experienced home improver, diy door trim molding is an accessible, eco-friendly way to achieve a fresh, modern look—quickly and confidently.
")